Showing posts with label Nutritional info. Show all posts

Wednesday, May 8, 2019

Avoiding Picky Eaters

Love this awesome visual for kids!

The news tonight was discussing the important of labeling food benefits for children specially when introducing new food. Helping them learn to make the connect that food isn’t just about eating what we “like” but about eating what our body needs to be nourished! 

Focusing on benefits that are not only accurate but are goals that children would be motivated to achieve - protein helps to build strong muscles so you can jump and climb, veggies give you energy so that you can run faster and grow taller and so forth ... young children really want to be big and strong motivating them to make connection that healthy eating is KEY to doing that!

Another trick I use with children is that your “taste buds” are just like everything else in your body - they grow bigger every day so while your taste buds might not have been big enough to appreciate broccoli (or whatever new food your trying to palette) today they might be bigger so it’s important to keep trying to see if your taste buds are big enough yet. Again children CRAVE being seen as “big enough” so using words and presentation of food in a way that motivates them to want to try verses trying to battle or barter or bribe them to get them to try! Intrinsic motivation is the BEST route to life long healthy eating! 

Have an amazing day

Margaret
Live Well, Laugh Often, Love Much
Be Totallyawake4-life

Monday, January 7, 2019

Epic Life - Good Food Real Results

So - life got busy and my wagon derailed over the past year or so - stress, injury, anxiety an array of excuses that resulted in my slipping into poor eating habits, poor health habits and slipping into a state where I did not have the mental health to be creative or put myself first at all. As a result I have let my blogging fall on the back burner however 2019 is a brand new year and I have begun to pull myself out of the fog of anxiety and depression and back to making myself and my health a priority again! 

 In September I took one small step towards moving back into the light and pushed myself to participate in a #90daychallenge through my good friend Lisa with her  Epicure business - it was an amazing experience at not getting me back on track with clean eating and moving more but to begin to restore my mental health as well!

The program is VERY simply which I love - a focus on clean eating with attention to a balanced plate and 3 balanced meals a day with a 'dessert' option in the evening meal .... I love this way of eating it is something that is backed with loads of science, research and supported by Canada's food guide and unlike other plans such as Atkins or Keto you do not hear the same alarming warnings on the news about the long term effects of balanced cleaning eating on your liver or kidneys and so forth. Unless required for medical reasons no 'food group' is proposed to be omitted in the Good Food Real Results program - just a focus on the balance and proper portion sizes of the foods you eat. So while I am still eating gluten free myself and many days still lean towards grain free eating due to insulin response from grains - there is room in the plan for accommodating a craving for pasta or bread and still seeing amazing results!

To be sustainable a lifestyle change needs to be maintainable and a commitment to being 'totally' grain free for myself was not something I was able to sustain long term because when I succumb to eating something I felt I 'should not' have I felt guilty and a failure and this led to additional self sabotage of my health  goals! With the Epic Life Good Food Real Results plan I am feeling I can balance a wide variety of foods that fuel and sustain me while seeing amazing results!

Another component of the program is the important role of 'planning' .... you create a written 90 day challenge statement of where you plan to be. The statement is written from the perspective of the 90 days have past and what is your life like - so you can envision your outcome as you move through the 90 days! It is wonderful inspiration to have a vision statement and board to reflect on!  You also plan for your WOOP moments of wish, outcome, obstacles, plan using the 'if and then statement's .... this is great for self reflection of knowing in the past what caused me to derail my success and to plan for those obstacles so that I will better succeed this time around!  And most importantly - you MEAL plan and prep to help make success easier! The plan provides 'sample menus' for the first 4 weeks to help those who need inspiration but also has the flexibility of build your own plan with foods and LOADS of amazing recipes on the Epicure website. Just search 'balanced plate' for ideas!  Having a plan for what you will be eating helps you to stay on task and goal as well as prepping easy to grab healthy foods prevents you from grabbing easy junk type foods!


The other component is keeping a gratitude and food, sleep, exercise journal.  Journal writing is something I have always seen a lot of value in - I know from life experience that writing things out - either formally or informally - has so many amazing benefits for the brain and your mental health and yet often it is the first thing I let 'lapse' when things get busy and this has consistently seen me slip back into states of higher anxiety and depression. Hopefully getting back into this amazing habit is the 'third millionth' time is a charm for me to remember to KEEP AT IT!  In addition to the gratitude journal I also love using the My Fitness Pal app to food journal and track exercise with ... it is really great visual for ensuring that while balancing your plate you also keep your caloric intake 'less' than you need for weight loss goals because lets face it not all food is created equally when it comes to calories - half a cup of broccoli has different caloric intake than 1/2 cup of corn so plate might be balanced but the calories are not!
The last component is accountability - taking measurements, weighing in and photos to help to track your progress and reporting them to both your accountability partner and for the 'challenge' via a private portal to be eligible for prizes! 

The program suggestions weighing in and doing measurements and progress photos every two weeks - I LOVE this because the reality is that the SCALE is not always my friend! My body tends to hold onto weight so I can be eating really well, moving my body lots at the gym and the scale will not budge for days on end - weighing myself or measuring too often during these times can lead to disheartening and self sabotage so 'trusting' the program and waiting for the bi-weekly measuring and photos really helped me to not get stuck in that mindset!   

The last challenge which ran from September 10th to December 4th I was able to release 30 pounds and 24 inches total throughout my chest, waist, hips, biceps and thighs ... an amazing result that I am very proud of!

Another challenge is starting TODAY and I am excited to see what the next 90 days will bring me!

If you would like to join me on the Epic Life Good Food Real Results Challenge more info about joining can be found here!

Have an amazing day!

Margaret
Life Well, Laugh Often, Love Much!  

Thursday, November 26, 2015

Creamy Lemon Dilly Chicken with Bacon

Did someone say BACON everything is better with bacon ~ including this tasty combination of flavors created in a one dish skillet that can be served either with cream or coconut milk depending on your dairy needs! We use to use the heavy cream but with me attempting to limit dairy tried it last night with the coconut milk and it tasted awesome too!


Creamy Lemon Dilly Chicken with Bacon
Serves 4

What You Need 
  • 1 tablespoon coconut oil
  • 4 x 4 oz servings chicken breasts - chopped to bite size
  • 4 strips bacon (chopped into small chunks) 
  • 1/2 sweet onion ~ finely diced measures 1/2 cup
  • 3 garlic cloves, minced
  • 1 teaspoon fresh ground pepper
  • 1/2 cup of homemade stock
  • 1 tablespoon Lemon Dilly Seasoning from Epicure or a pinch of fresh dill weed chopped finely
  • 5 thin lemon slices
  • 1/4 cup heavy cream or for a dairy free version use Coconut Milk or other alternative.
  • 1 cup of flash frozen peas
What You Do
  • Melt coconut oil in the skillet. Saute onions, bacon, garlic and pepper in the oil for a couple minutes to let it absorb their flavors and the bacon to crisp up.
  • Add chicken to the skillet and cook chicken a couple minutes on each side to sear the edges and flavor from the oils in. 
  • Once the chicken is seared add your stock, lemon dilly spices, and sliced lemon over the top of the chicken and cover and let simmer as the stock reduces 'down' and gets thicker. About 8-10 minutes over medium heat ~ check to make sure chicken is heated to 165 F with a meat thermometer or no pink is visible in the middle of chicken.
  • Remove lemon slices and disgard and either move chicken/bacon to the very 'edges' of your skillet for a minute so that the stock in the middle or if you do not mind a second dirty dish temporarily remove from chicken from the pan and slowly stir in the cream into the thickened stock to form your cream base. Bring sauce to a boil and than reduce heat and return chicken along with peas to your skillet.
  • Cover and let simmer for another 5-10 minutes to cook the peas in the cream sauce and ensure that the meat has reached the proper internal temperature. 
 Nutritional Breakdown

If you are doing the #21DayFix you would count 1/4 of this recipe as is ~  1.25 red for chicken and bacon, 1/2 a yellow for the peas, 1/4 green for the onion, 1 tsp for the coconut oil and if you use the coconut milk option than 1 blue. 

The following is the nutritional facts of just the above using heavy cream or coconut milk options does not really change the calories but the coconut milk option appears to change the 'high in cholesterol' warning to 'high in saturate fat'  ~ depending on what you serve it 'over' will change the totals below.


We had it served tossed with spaghetti squash for a grain free version as well as so that it used a 'green container' for myself ... it would taste lovely over a pasta or rice of your choice if you can par take in those options . 


Have an amazing day!

Margaret
Live Well, Laugh Often, Love Much
Totallyawake4-life


Tuesday, November 24, 2015

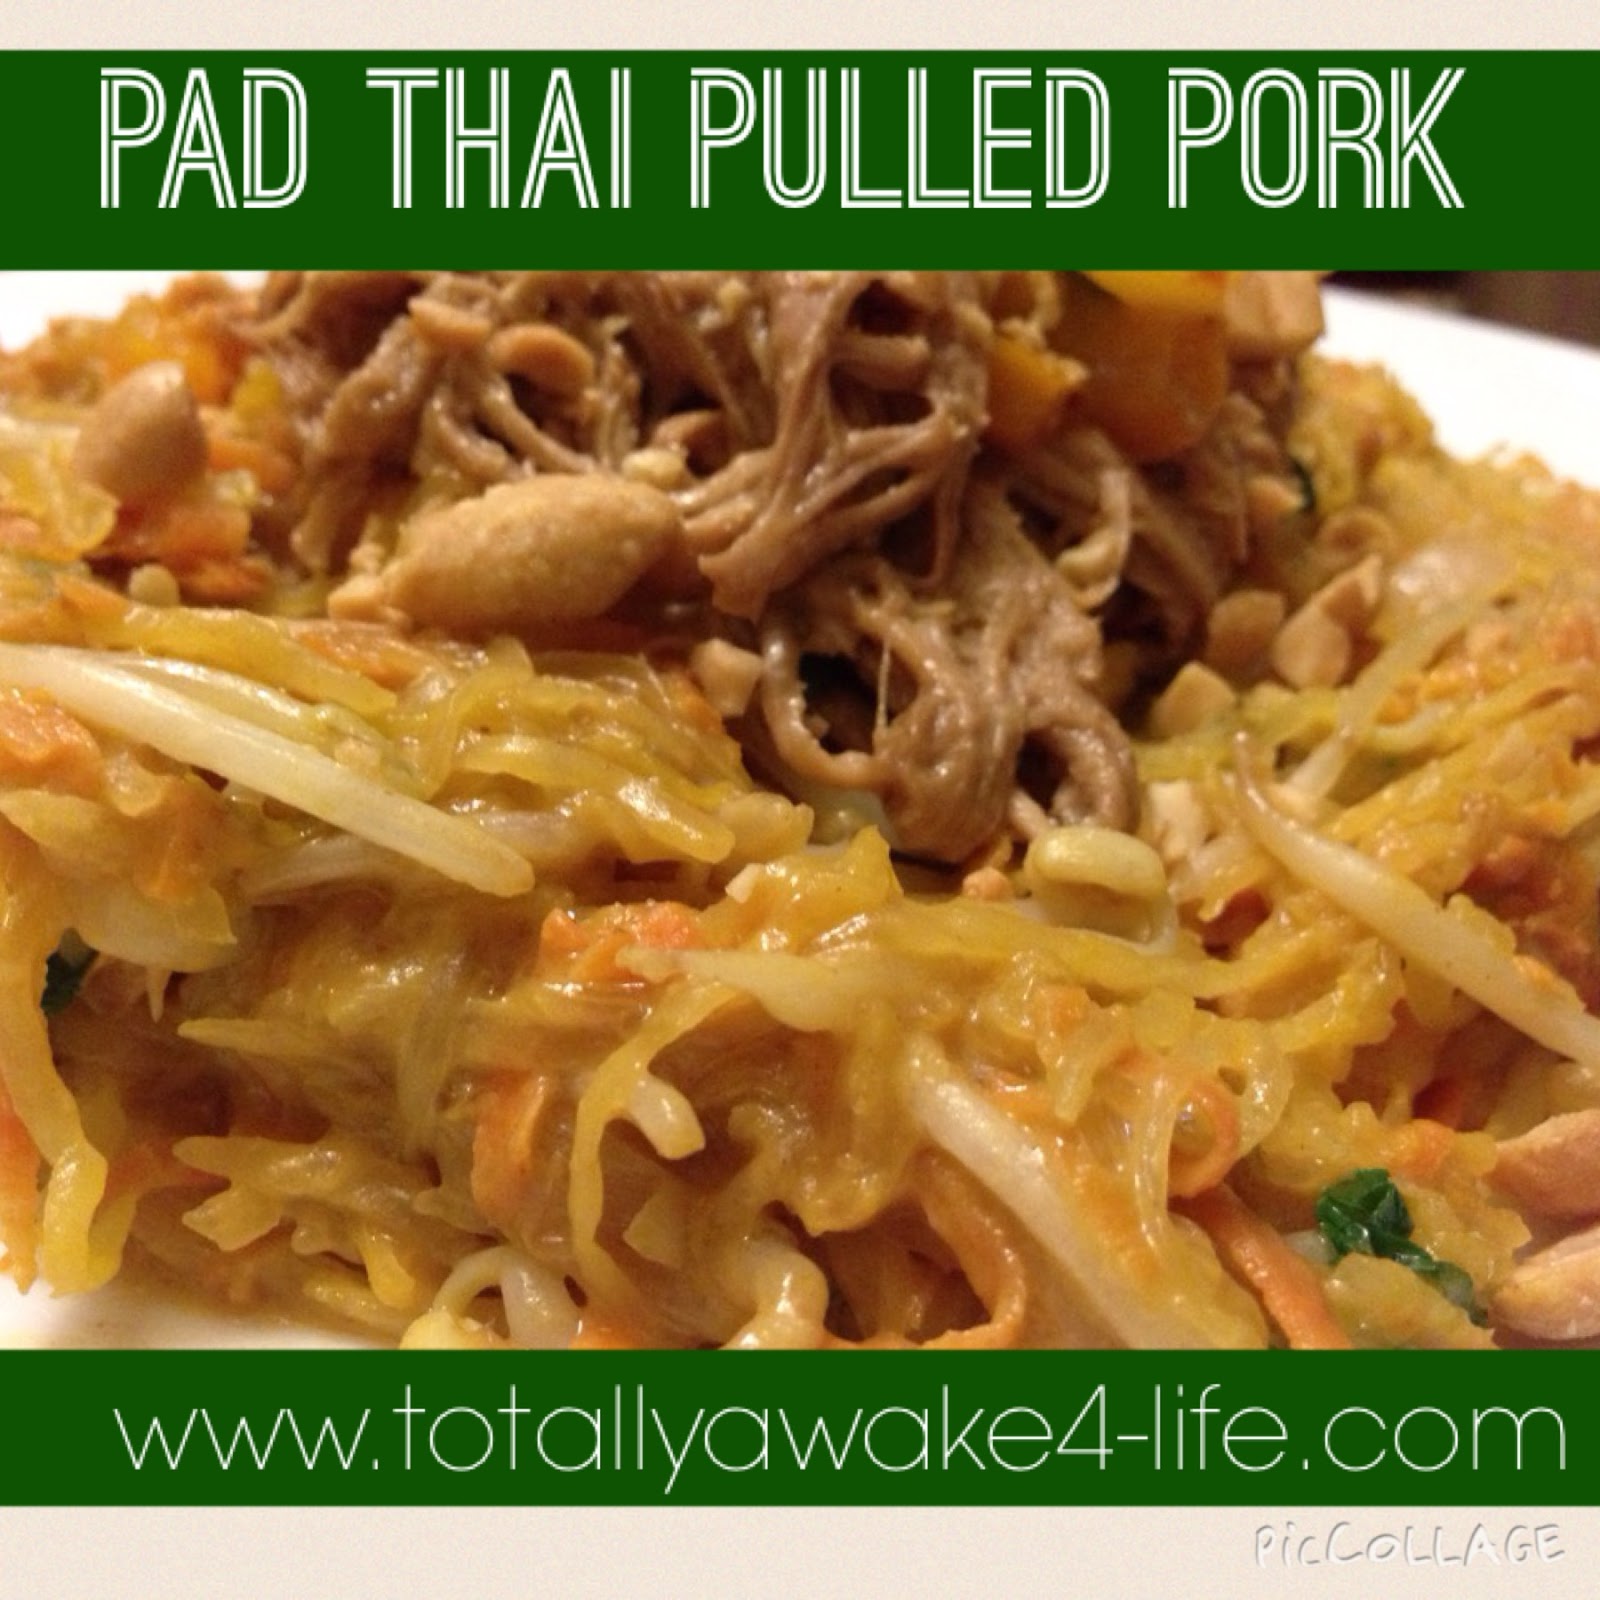
Paleo Inspired Pad Thai


We were in the mood for some Pad Thai ~ so playing with our old favorite and how to make it Paleo Inspired this week ... I have to say the stepson had two helpings so that was a sign that it turned out tasty. Myself I had to add some extra 'hot chilies' to mine at the table mostly because I am fighting a cold this week and think my taste buds were just shrouded by that so I needed the extra heat to clear my sinuses so I could actually taste the creamy delight that this actually was!


 Pad Thai Pork in the Crockpot
 Serves 6

What You Need
  • 1 lb. boneless pork loin
  • 1/2 green bell pepper, cut into strips
  • 1/2 red bell pepper, cut into strips
  • 1/2 cup prepared grain free Teriyaki sauce
  • 1 teaspoon red pepper flakes - more of less to taste depending on how spicy you like
  • 2 cloves garlic - minced
  • 4 tablespoon nut butter (peanut, almonds, cashew)
  • 1/2 cup chopped fresh cilantro
  • 1/2 cup chopped green onion
What You Do
  • Place pork, Teriyaki sauce garlic, and red pepper flakes in crockpot.
  • Cook on low for 6-8 hours.
  • Stir nut butter into the liquid until evenly distributed.
  • Shred meat with two forks right in the sauce of the crockpot.
  • Add sliced peppers, and return meat to crockpot.
  • Cook approximately 30 minutes until peppers are slightly cooked, but still crisp.
  • Just before serving, stir in green onion and cilantro.
  • Can be served over spaghetti squash pad thai below, or with rice, in lettuce wraps, or on top of salad.
 Nutritional Breakdown 

So if you are fixing it would be 1 red for pork, 1/2 green for peppers/onions and 1 tsp for peanut butter ... for those who like the calories and other tidbits this is the breakdown from over at Calorie Count


Spaghetti Squash Pad Thai 
serves 4

 What You Need
  • 4  cups of Cooked Spaghetti Squash
  • 1/2 cup Shredded Carrots
  • 1/4 cup Green Onions
  • 2 Garlic Cloves ~ minsed
  • 1 tablespoon Minced Ginger
  • 1 Tablespoon Coconut Oil
  • 1 Egg
  • 1/4 cup  Bean sprouts
  • 2 tablespoons of prepared grain free Teriyaki Sauce
  • 1 tablespoon of nut butter
  •  Cilantro and Almonds or Peanuts (optional for garnish)
What You Do
  • Melt coconut oil in a pan and saute onions, garlic, ginger and carrots for about 2 minutes.
  • Add egg scramble until cooked through. Then remove the mixture from the pan and set aside.
  • Mix together teriyaki sauce and peanut butter ingredients in a small bowl.
  • Warm spaghetti squash in the pan over low heat and stir in the peanut sauce. Then add in the onion/carrot mixture and bean sprouts.
  • Serve your “noodles” on a plate with pulled pork from above over top or as a 'solo lunch dish' or omit the egg add tofu to it to make it 'vegan'.
  •  Top with cilantro and nuts.
 Nutritional Breakdown  

So if you are fixing it would be 2 green for squash, carrots, onions and 2 tsp for peanut butter and coconut oil and 1/2 blue if you top with the nuts I personally would not count the egg cause its such a small amount mixed in ... for those who like the calories and other tidbits this is the breakdown from over at Calorie Count


Over all this was six thumbs up around the dinner table last night ~ I found mine so filling I did not even finish so have leftovers to have with my lunch today!


Have an amazing day!

Margaret
Live Well, Laugh Often, Love Much!


Sunday, November 22, 2015

Chocolate Chai Energy Bars

Looking for a little pick me up in the morning or afternoon? These nutrition packed perfect petite sized Chocolate Chai Energy Bars from Epicure pack a nice flavor and a lot of punch!
 Chocolate Chai Energy Bars
Serves 24
What You Need
  • 6.5 ounces of blanched almonds
  • 1/2 Cup  Pure Cocoa
  • 1/2 Cup Madjol dates- pits removed
  • 1/2 Cup  raisins
  • 1/4 Cup  chia seeds
  • 1/4 Cup  flax seeds
  • 2 tsp Chai Spice
  • 1/4 Cup  nut butter~ we use almond butter
  • 2 Tbsp raw honey 
What You Do
  1. Blend first seven ingredients in a food processor.
  2. Melt nut butter and honey in microwave, drizzle over mixture in food processor.
  3. Pulse mixture until all ingredients are blended.
  4. Divide mixture evenly between sections in an Perfect Petites mold. Press in lightly.
  5. Refrigerate until firm.
  6. Flip petites onto an Baking Sheet or parchment paper and twist to pop out energy bars.
 Nutritional Breakdown

Chia seeds are high in Omega-3 fatty acids and Calcium which are awesome alternative for someone like me who is not a big fish lover and is limiting dairy.
Have an amazing day!
Margaret
Live Well, Laugh Often, Love much

Wednesday, November 11, 2015

Jalapeno and Goat Cheese White Bean Dip ~ oh my!

I was a little skeptical of the white beans but the goat cheese and Jalapeno's had me drooling so thought I would give this one a try for a recent potluck offering we were invited too.

A #repost recipe review from over at the doTERRA blog 

Jalapeno and Goat Cheese White Bean Dip

What You Need
  •  2 cans white kidney beans
  • 1-2 Jalapenos depending on the heat you enjoy
  • 2 ounces Chevre Goat Cheese
  • 1 toothpick of Cilantro essential oils
  • 2-3 drops of Lime essential oils
  • 1 tsp cumin
  • 1 tsp raw honey
  • 1 tsp salt (optional I personally do not add salt to my cooking)
  • 1/2 tsp fresh ground pepper
  • 1-2 tablespoons of Extra Virgin Olive Oil
  • 1-2 tablespoons of water ~ if desired for consistency
What You Do 
  •  Preheat oven to broil  500F or preheat the BBQ if you like. Place the whole jalepeno on a roasting pain in the oven or direct to the BBQ and grill on each side turning when skin starts to blister get brown markings. Cook evenly on all sides and than place in a covered bowl ~ this allows the skin to 'loosen'. When cool remove the skin (should peel off now) along with stem and seeds. Chop finely. If you want to 'skip' this step and are not concerned about your sodium content or other processed food concerns they do sell these 'pre-made' in the Taco section at most grocery stores. Ole El Paso is one brand I have seen.
  • Place all ingredients, except the Cilantro oil, Olive oil and water into the food processor.
  • Pulse 5-6 times and than add the Cilantro by the toothpick 'swirling' the toothpick around through it. Essential oil are much stronger a little goes a LONG way! 
  • Pulse 10-15 more times while slowly adding the EVOO a little bit at a time until desired consistency is reached. If needed after the 2 tablespoons of oil than use some 'water' as well to keep the oil content down.
  • Taste test to check spice level ~ add more cumin, pepper, cilantro or lime if desired
  • Store in fridge until ready to serve ~ serve at room temperature
  • Dip goes great with veggies or sweet potato chips!


And for those who like to know the nutritional breakdown of a tasty 2 tablespoons of this for a snack .... high fiber and protein and making the Jalapenos yourself it has a low sodium content. Store bought option will likely drive that right up.

 
Have an amazing day!

Margaret
Live Well, Laugh Often, Love Much
Totallyawake4-life
Jalapeno and Goat Cheese White Bean Dip with Cilantro and Lime Essential Oils
2 cans white kidney beans
1-2 jalapenos, depending on your preferred spice level
2-ounce plain goat cheese
1 toothpick Cilantro essential oil
1-3 drops Lime essential oil
1 teaspoon cumin
1 teaspoon honey
1 teaspoon salt
1/2 teaspoon pepper
1-2 tablespoons extra virgin olive oil
1-3 tablespoons water for desired consistency
Health Highlights:
* White Kidney Beans- These legumes are filled with antioxidants that can help fight off certain types of cancer, heart disease, and other degenerative diseases. A one cup serving of white kidney beans contains almost half of your recommended daily fiber needs.1
* Jalapenos- Capsaicin is the substance in jalapenos that gives it its kick. Additionally, capsaicin can also help raise your metabolism and diminish your appetite, which can aid in weight loss.2
* Goat Cheese- This type of cheese has significantly less sodium than most cheeses. Making a switch to goat cheese can help reduce the risks associated with high sodium diets such as high blood pressure and cardiovascular disease.3
Directions:
1. Preheat oven to broil (500°F).
2. Place jalapenos on a baking sheet and rub with olive oil. Roast peppers under the broiler until jalapeno skin is blistered and blackened (about 5-10 minutes). Turn them with a pair of tongs periodically to ensure all sides are equally done. Once done, pull jalapenos from the oven with a pair of tongs and place in a covered bowl. This allows the skin to steam and loosen. Remove skins (they will peel off), tops, and seeds, then roughly chop.
3.  Place all ingredients, except Cilantro essential oil and olive oil, into the bowl of a food processor.
- See more at: http://doterrablog.com/jalapeno-and-goat-cheese-white-bean-dip-with-cilantro-and-lime-essential-oils/#sthash.ZyY8T4VR.dpuf

Sunday, November 8, 2015

Sweet & Savory Meatloaf

Sweet & Savory Homemade Meatloaf
The boys were craving some comfort food this week ~ so decided to look at how I could 'fix' my meatloaf recipe to make it grain free but still moist and tasty! Think we found a keeper with this blend of ingredients! 

Sweet & Savory Homemade Meatloaf
Serves 8

Sweet & Savory Homemade Meatloaf
What you Need
  • 2 pounds extra lean ground beef (chicken or turkey would work too)
  • 1 pound bacon
  • 1 medium sweet potato
  • 1 cup almond flour
  • 2 eggs
  • 1 onion
  • 5.5 ounces of tomato puree 
  • 2 tablespoon Meatloaf Seasoning ~ we love our Meatloaf Seasoning from Epicure however you can use a blend of garlic, pepper, parsley, rosemary.
What you Do

  • Cut bacon into small pieces and saute in a pan until cooked tender but not too crispy.  Set on a paper towel to absorb fat.
  • Shred your raw sweet potato
  • Chop onion to the size your family will like.
  • Combine meat. bacon, sweet potato, onion, tomato paste, egg, almond flour and spices in a bowl and mix until ingredients are all well distributed.
  • Place into a greased meatloaf  pan ~ we love our Pampered Chef stone for making 'mini meat loaves'

    because than like a brownie everyone gets some 'crispy edges'! 
  • Bake in the oven at 400F for 45 minutes or until meat is no longer 'pink' in the middle ~ baking time might vary depending on the size of your baking pan. 
  • Serve with your favorite sides ... we opted for Riced Cauliflower and Asparagus ... it was delicious!


Sweet & Savory Homemade Meatloaf
 For those who like a nutritional breakdown for an 1/8 of the recipe per serving ... pretty fair  protein, carb and fiber ratio and it was so tasty it could be a meal in itself!


 Have an amazing day!


Margaret
Life Well, Laugh Often, Love Much
Totallyawake4-life


Saturday, October 31, 2015

Leftover Candy Corn?


Well who knew this little candy corn hack? 

I will admit that as a child and even into adulthood 'Candy corn' was always been one of those Fall / Halloween candies that I thought was icky and would avoid at all costs ~ at least until a few years ago when I came across a recipe online for Homemade Butterfinger bars ~ and while iti s not hte 'cleanest' of treats it is a great way to make use of these often abandoned candies from the kids Halloween stash.  Also my apologies but I do not remember the initial 'source' of this amazing little treat cause it was before my introduction to Pinterest when I would just 'write down' recipes! 

Homemade Butterfinger Bars 

Homemade Butterfinger Bars
What you Need 
  •  3 cups of candy corn ~ Celiac Disease association has a great list of GF candies here
  • 1 cup of all natural peanut creamy peanut butter
  • 10 ounces high quality melting chocolate ~ milk or dark you choose
What You Do
  • Using medium heat in a large pot on the stove or if you prefer a bowl in the microwave melt the candy corn stirring often until it is smooth and lump free.
  • Add in the peanut butter and stir until well combined.
  •  Using either a parchment lined bar pan OR the handy dandy Epicure Petite Bar pan  that is little sprayed with some coconut oil pour the melted candy corn / peanut butter mixture and spread until about 3/4 inch thick allow to cool in the fridge until solid enough to keep its form. 
  • If using a bar pan cut the mixture into bite size bars about 1 inch x 2 inch while it is still soft enough to cut but firm enough to keep its shape once sepeated by the knife and than return the cut pieces to the fridge until HARD all the way through. If using the Epicure bar pan skip this step and just leave bars in the fridge until HARD and than pop out the bars onto parchment paper lined flat cutting board or bar pan.
  • When the bars are cooling melt the melting chocolate in a bowl over medium heat either on the stove or in the microwave stirring to keep it smooth. 
  • Using a fork dip the 'bars' into the melted chocolate and return to the parchment paper and continue process until all bars are dipped in chocolate. 
  • Return bars to the fridge to allow chocolate to 'set'.
  • Store in an airtight container until ready to serve or FREEZE and take out one bar at a time to have as a little treat! 
For those who need to know the calorie and nutritional breakdown here it is when the recipe makes 24 bars ~ if you make your bars bigger or smaller it will affect the outcome. They are definitely a 'treat' when you take in the size of the serving and the caloric and carb intake in comparison but they are such a very TASTY treat!


Here is a cool little video about the Epicure Bar pan that shows why it is a staple in my kitchen ... it makes the perfect size servings for 'little hands' or those of us who are watching our caloric intake ... we use it for muffin bars, pancakes for on the go, crust-less quiches, pizza muffin bars, granola bars and so forth ~ IMO it is a must have in the kitchen!

Have an amazing day!

Margaret
Life Well, Laugh Often, Love Much!
Totallyawake4-life

Thursday, October 29, 2015

Yummy Mummies with a warm bowl of Blood Soup

The older boys have finally started to notice 'Halloween' out in the community so we've been getting in the Halloween spirit the last few days with arts and games and well including having some fun with Halloween inspired FOOD! 

Today's lunch was a huge hit ~ it got a resounding 10 thumbs up around the table with everyone having seconds and one little muncher had fourths!

Mummies to Munch

What You Need
  • Pizza Dough ... you can use Pillsbury if you're ok with the processed as that is where I got the initial idea from was using their dough or you can make your own homemade from scratch. This time I compromised between the two because I still have a few left in the cupboard from before I went 'grain free' so I used the Glutino Pizza Crust mix 
  • Hot Dogs ... again your choice I sourced a All Natural Gluten Free option

What You Do
  • Prepare your dough as per instructions and roll out thin and slice in strips
  • Get the children to help you 'wrap' their mummies with the dough strips
  • Some samples online show using black olives slipped in for the 'eyes' but we just put a dollop of ketchup on ours cause we do not eat black olives normally so did not have any on hand.
  • Place on a parchment paper or greased cookie sheet and bake in a 375F oven for 15-20 minutes until your mummies are golden brown and the wieners are sizzling.
  • We served with the Blood Soup below ... aka Roasted Red Pepper and Butternut Squash

Roasted Red Pepper and Butternut Squash


What You Need
  • 2 cups of Roasted Red Peppers ~ approximately 3 red peppers. 
  • 5 roasted cloves of garlic 
  • 1 cup of leftover roasted butternut squash
  • 1/2 cup of diced sweet onions
  • 2 cups of stock ... vegetable or chicken your choice, homemade or store bought, we make our own.
  • Fresh Ground Pepper to taste typically about 1 tsp
  • Pinch of Crushed Red Chili ~ specially if serving to children I add more to my own to taste afterward.
What You Do
  • For the roasted red peppers. We cut our peppers into 4 large pieces and roast ours on the BBQ rubbed with some coconut oil and pepper sear them on both sides and than move them off the direct heat and let the roast in the BBQ until soft but you could also use 'store bought' roasted red peppers in a pinch just be warned that it will add sodium and sugar to your recipe count.
  • Roast your garlic when you are doing the peppers ~ we just put them in a oil sprayed tinfoil on the BBQ or you could use a garlic roaster. 
  • In a large pot saute your onions in 1 tsp of coconut oil until caramelized
  • Put all the ingredients into your blender and hit the 'soup' button or puree button OR if you have a hand held immersion blender you could put them directly into your pot on the stove with the onions. Puree until smooth.
  • If using a blender ttransfer puree to a pot
  • Heat soup over medium heat until starts boiling and remove from heat.
  • Serve ~ I opted for a bit of shredded mozzarella on top of mine cause unlike the kids I was not having a 'mummy' to munch with mine so wanted some added protein.
Roasted Red Pepper & Butternut Squash Soup

 And for those who like a 'break down' of what this means nutritionally this is without the 'cheese' topping ... I think it was a BANG ON cause it was nice and filling but low calories and packed high with vitamins! They say it is high in 'sugar' but there is no ADDED sugar that is because with the low calorie compared to the naturally occurring sugar in the squash and peppers! 


 Have an amazing day!

Margaret
Live Well, Laugh Often, Love Much
Totallyawake4-life